Jun 26, 2023 · 8 mins read
Authentication — A Step-by-Step Explanation
Authentication — A Step-by-Step Based Explanation | by Umakant Vashishtha | Jun, 2023

Umakant Vashishtha
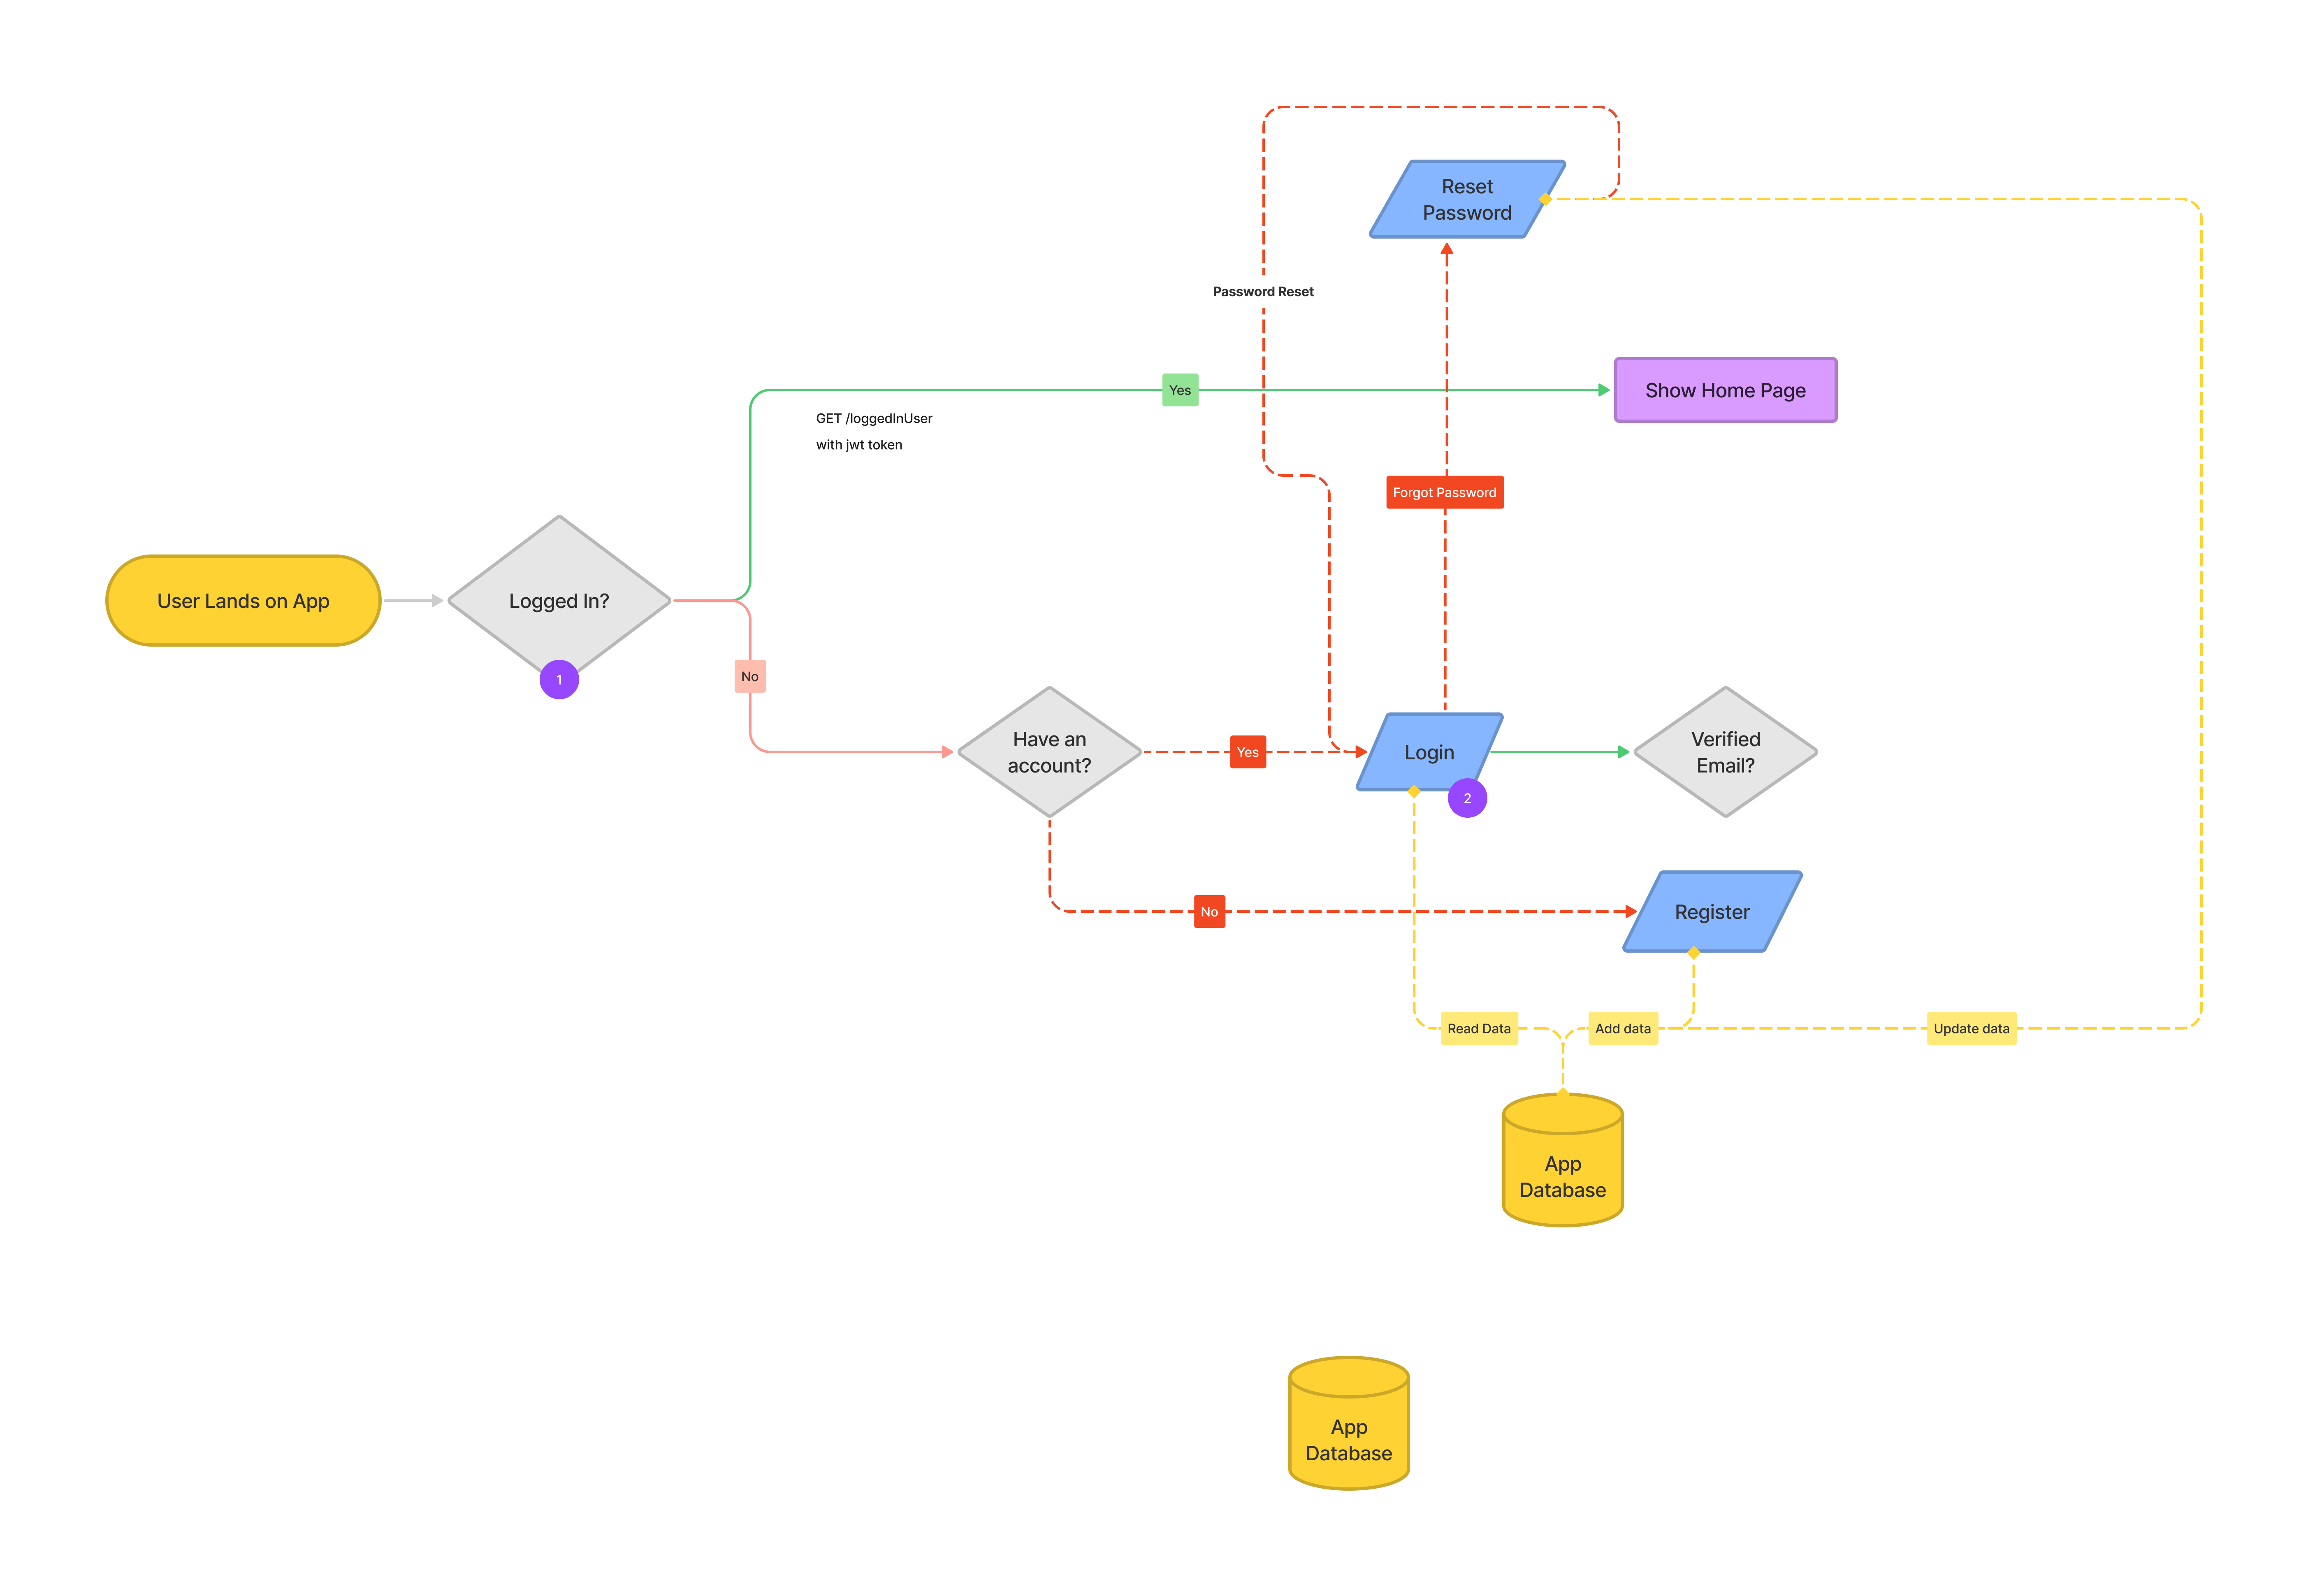
Authentication Flow Diagram
Introduction
In this post, I will talk about Authentication, especially the authentication setup while building full-stack projects.
I have seen beginner students struggle to understand authentication, and a lot of times they even give up. It’s a slightly challenging concept to grasp, I admit. But I believe it could be explained in a simple way and that’s why I decided to take a dig at this topic.
Let’s understand the problem
These days, most application have at least three components — frontend (client), backend (server), and a database. I am going to take the example of a simple application — a blog application.
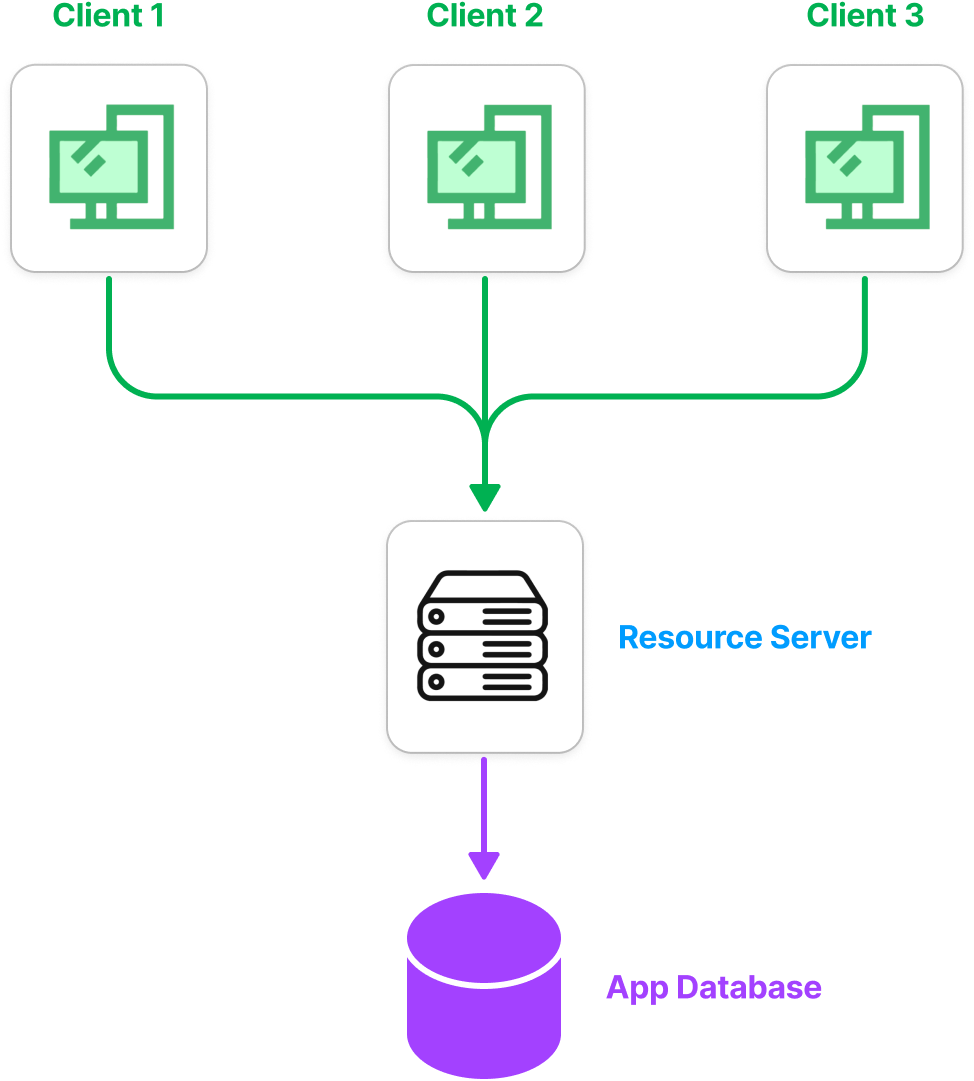
The client side makes request to ask for resources (essentially, the static files and the data we store) or to make changes to the resources. But not everyone can take all actions, there is resource-ownership that we need to protect. A few examples of the actions we need to prevent.
- a user must be logged in before adding a post or a comment
- a users should not be able to delete other users’ posts
- a user should not be able to add posts on other users’ behalf
Let’s take the following scenarios for our application that we will try to understand.
- A user does not need to login to read a post
- User must be logged in to add comments on a post
- User must be logged-in to like a post, likes should be from unique users
With these requirements, it’s important that we identify for each request whether the user is not logged in or if the user is logged-in then identity the user.
This identification needs to be server-driven to keep it secure.
Flow of Requests
First the user has to sign-up, say using name, email and password. Server will check if the user is a new user and not already registered user.
The user can then login using these credentials.
The only time our server gets to know the details of the user is when the user make the log-in request, after that we don’t ask for user’s credentials on each request as that would be a bad experiemce for the user.
Naturally, that is the only time we can tag the user with something that can help us identify the user later for each request.
- In the login request, our server generates a
tokenand send it in the response. This token is an encrypted string (more on that later) that contains the details of the user (with the user’s unique identifier) and also possibly the time of its expiry.
- Once the client recieves this response, the client has to store it and send it in each subsequent requests (as a request header, say
authorizationheader). - Before processing each request, the server should check for the value of this header in the request. Server has to validate the token if present, so that it is created by the server itself and no-one can generate an
encrypted tokensimilar to that of our token. Server then decodes the token and gets the user info associated to the request.
Encrypted Token and Security
The type of the token we generate from the server is called JSON Web Token (JWT). Suppose we want to encrypt the following data for the user’s jwt token. This data is called the payload.
payload{
  "id": 123,
  "name": "John Doe",
  "email": "john.doe@example.com",
  "iat": 1688017152,
  "expire_at": 1688157152
}
The above payload will produce a token like this:
eyJhbGciOiJIUzI1NiIsInR5cCI6IkpXVCJ9.eyJzdWIiOiIxMjM0NTY3ODkwIiwibmFtZSI6IkpvaG4gRG9lIiwiaWF0IjoxNjg4MDE3MTUyLCJleHBpcmVfYXQiOjE2ODgxNTcxNTJ9.Npad24X_TURMHfemNyrZBEowPENhbnzrphwXUWx0Apc
To issue a token and make sure the none else can issue the same token again for the given payload, we use a secret. This secret, as the name suggests, is supposed to be kept secret by the issuer and is stored only the server and it should not be easy to guess.
Auth Routes Implemented by Server
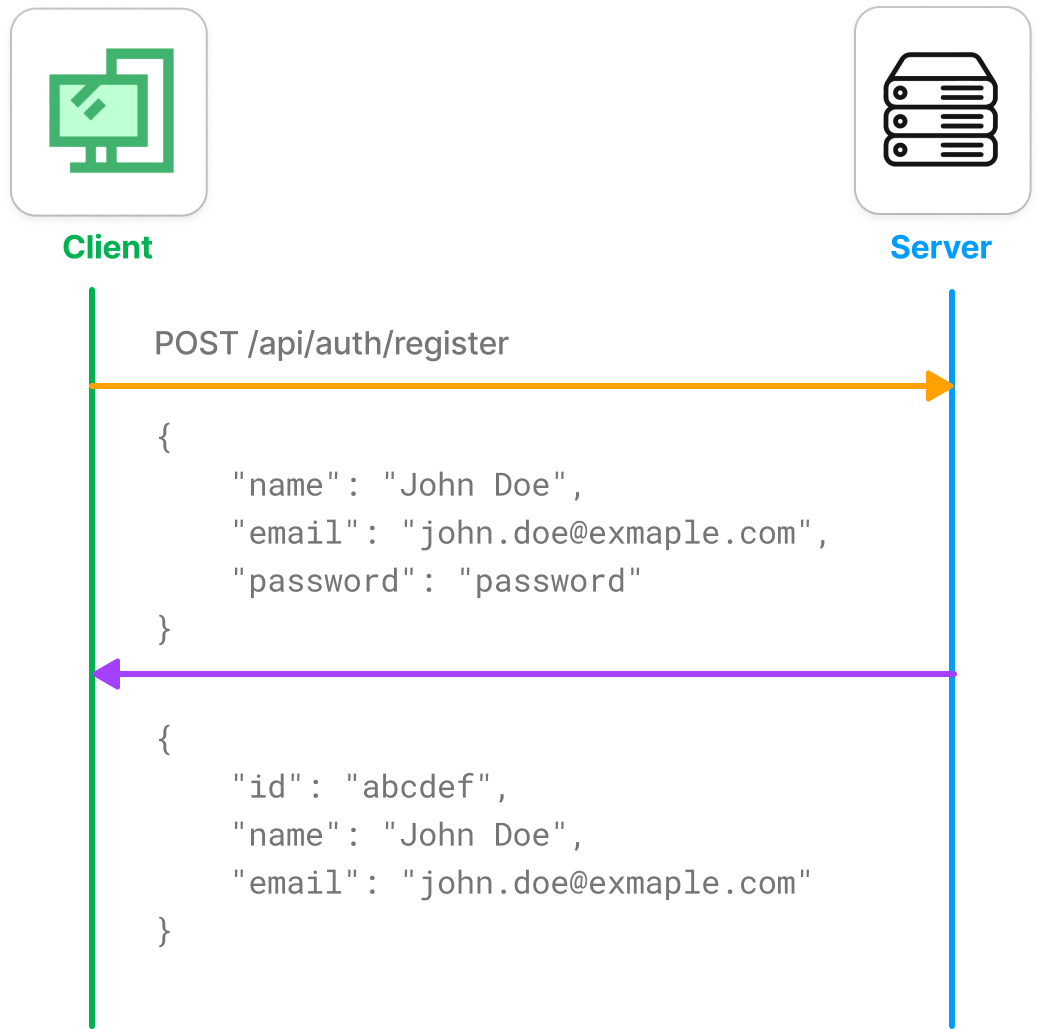
POST /api/auth/register
This route takes user details (name, email and password) from the request body and adds a new user if user has not already created account.
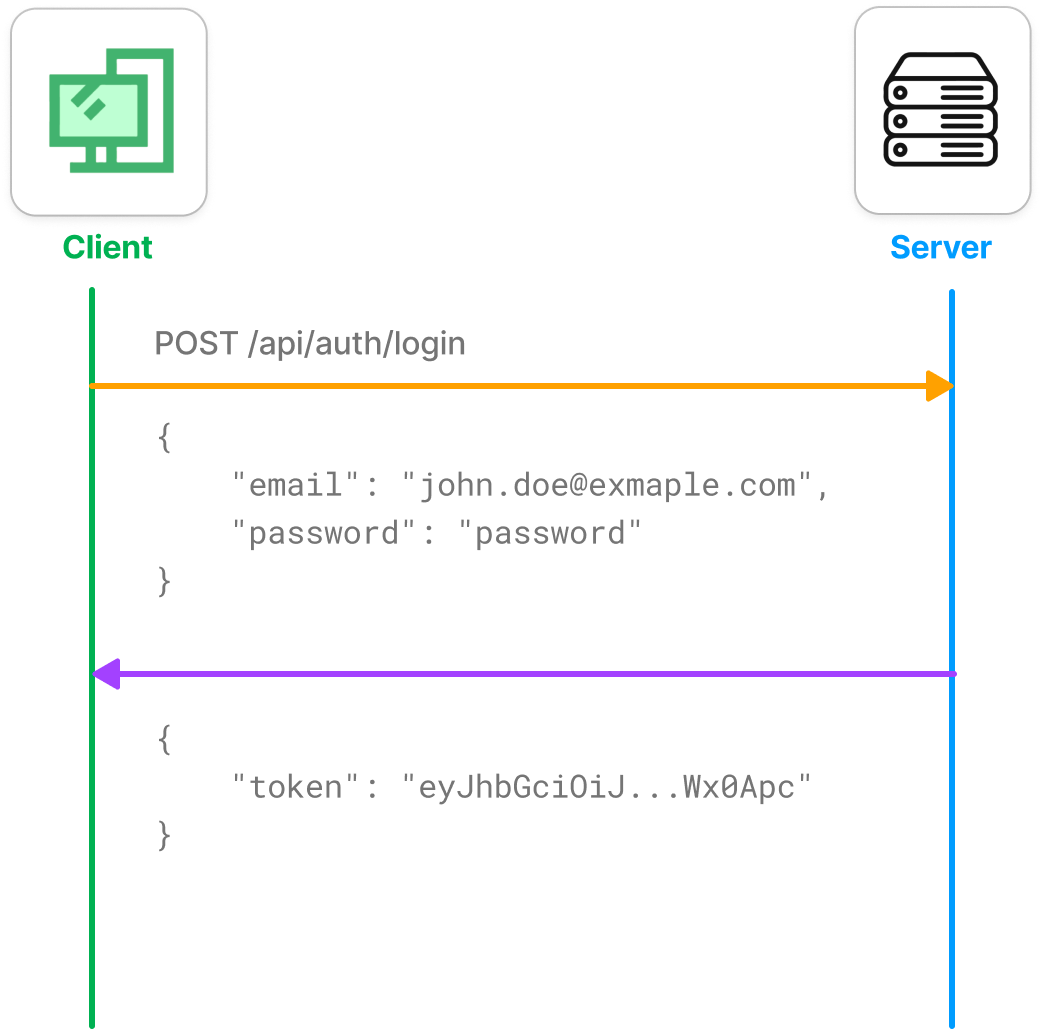
Password is hashed before storing into the database.POST /api/auth/login
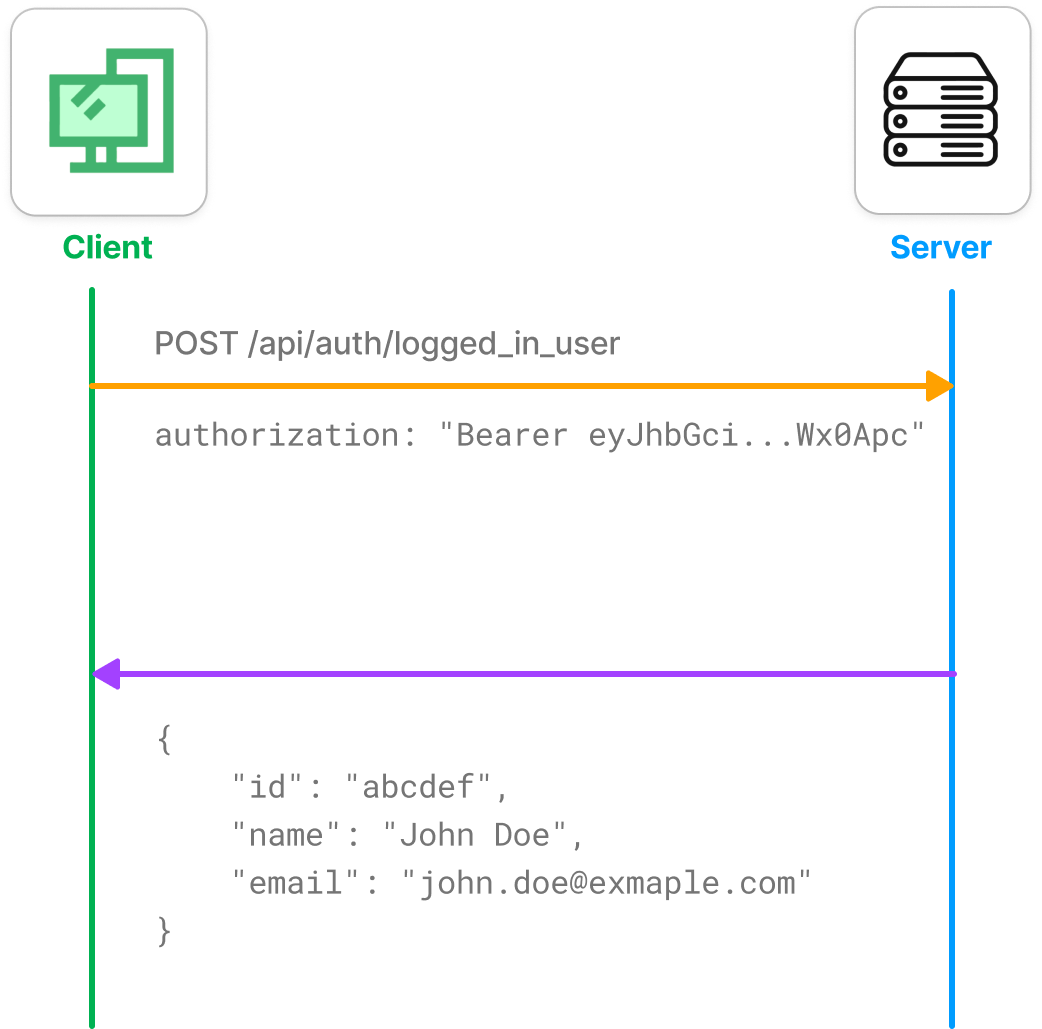
This route validates the credentials provided in the request body. If the credentials are valid, then server generates aJWTtoken and sends in the response. Client has to store this on user’s brower, either usinglocalStorageor server can set this as acookiesin the response.GET /api/auth/logged_in_userOnce logged-in, the user can close the app and come back to the application. Every time user restarts our application, we want them to stay logged-in.
Since we have the jwt token generated by the server received in the/api/auth/loginresponse, our client application can send a request to the server to check the validity of the token and decide whether the user is logged-in or not. Once validated, the server responds with the user’s details or returns an error. If received an error, the client application can prompt the user to login or browse the application in an unauthenticated mode.
Protecting Resources
Let’s say the user submits the form to add a blog post. In the request, we should not send author details (our server should never trust such information from the client application), rather the stored jwt token should be attached in the request as authorization header and the server will identfy the user based on the token and attach it to the post.
The diagram below would help us understand this flow.
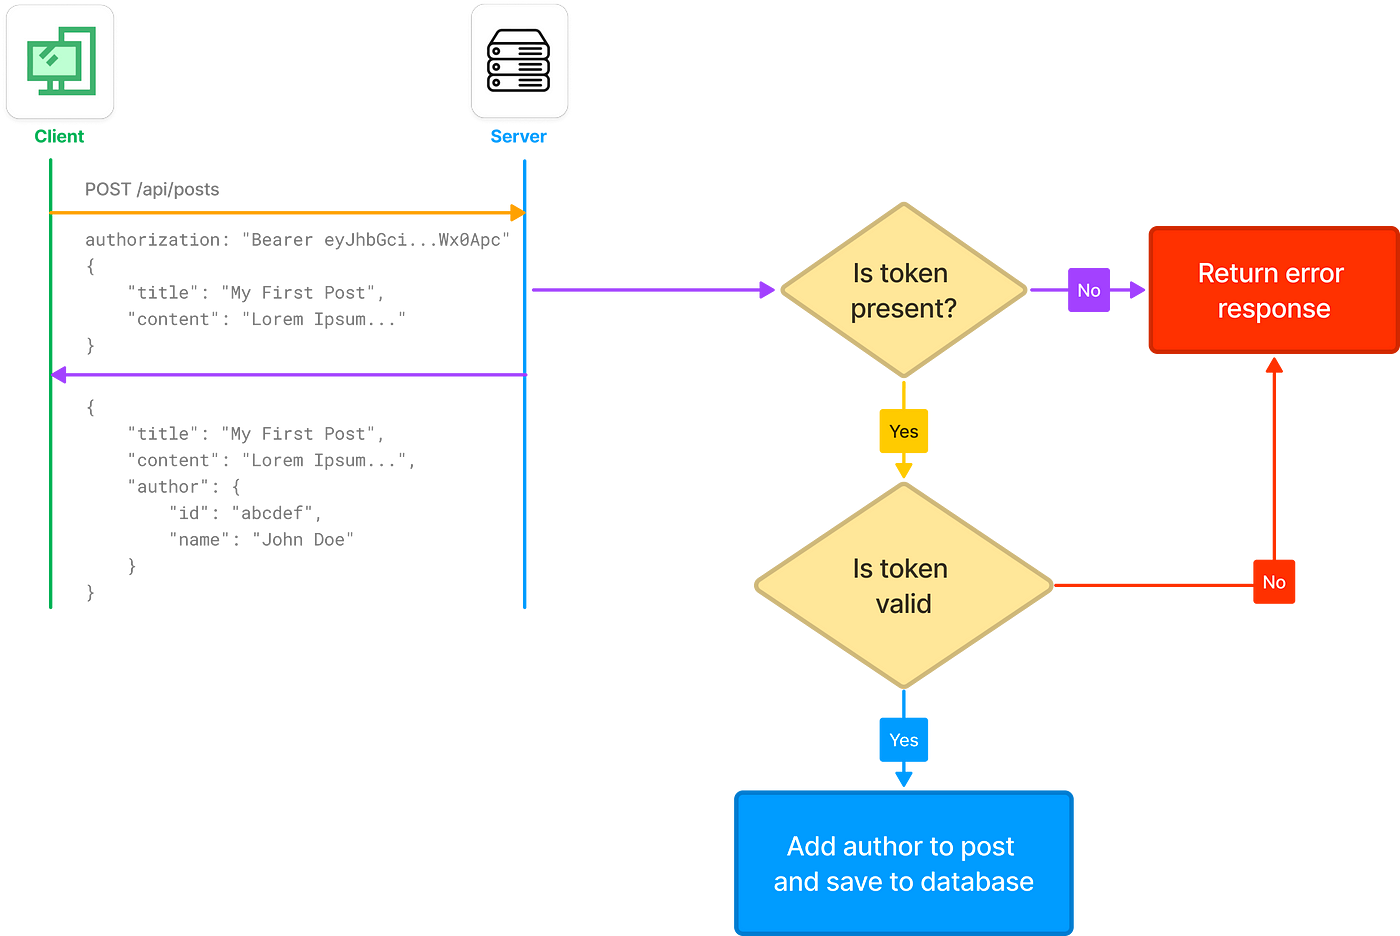
Similar process should be used to validate the user in the following requests:
PATCH /api/posts/:postIdorDETELE /api/posts/:postId
Update or delete a post — only the post owner should be able to take these actionsPOST /api/commentsAdding a comment on a post — only a logged-in user should be able to add a comment
The Middleware Friend
Since the step to check for the token and to validate it is usually required for almost all requests, it’s better to abstract this part into a middleware (say, auth middleware) and reuse it. From the middleware, if the user is authenticated, we attach the user into the request context to use at a later point the request handler. In all other cases, the request handler can repond with an error.
Here is the express middleware for such a setup.
middlewares/auth.js
const userService = require("../services/users.service");
const { verifyToken } = require("../utils/tokens");

async function auth(req, res, next) {
  let token = req.headers.authorization || "";

  const [type, token] = token.split(" ");

  if (type == "Bearer" && token) {
    try {
      const result = verifyToken(token);

      let user = await userService.getUser(result.id);

      // attach the user to the request context
      req.user = user;
    } catch (err) {
      // No action to take right now
    }
  }

  next();
}

module.exports = auth;
Hopefully you were able to understand more about authentication from this post. Let me know if anything sounds confusing or can be improved by sharing your comments.
I will probably write a separate post for generating and validating JWT tokens, please let me know by sharing in the comments.
Follow me at https://umakantv.medium.com/ for more content related to web-development and software design. 😄
Similar Articles
Buffered vs Streaming Data Transfer
Comparing buffered and streaming data transfer in Node.js server
Oct 27, 2023 · 15 mins
Using Signed URLs in React | File Upload using AWS S3, Node.js and React - Part 3
Building the react application to upload files directly to AWS S3 using Signed URLs generated from our node.js application.
Oct 15, 2023 · 15 mins
Setting Up Node.js App | File Upload using AWS S3, Node.js and React - Part 2
Setting up Node.js application and use AWS SDK to generate S3 Signed URL using AWS access credentials that will be used in our react application to upload files directly.
Oct 07, 2023 · 20 mins
