Oct 07, 2023 · 20 mins read
Setting Up Node.js App | File Upload using AWS S3, Node.js and React - Part 2
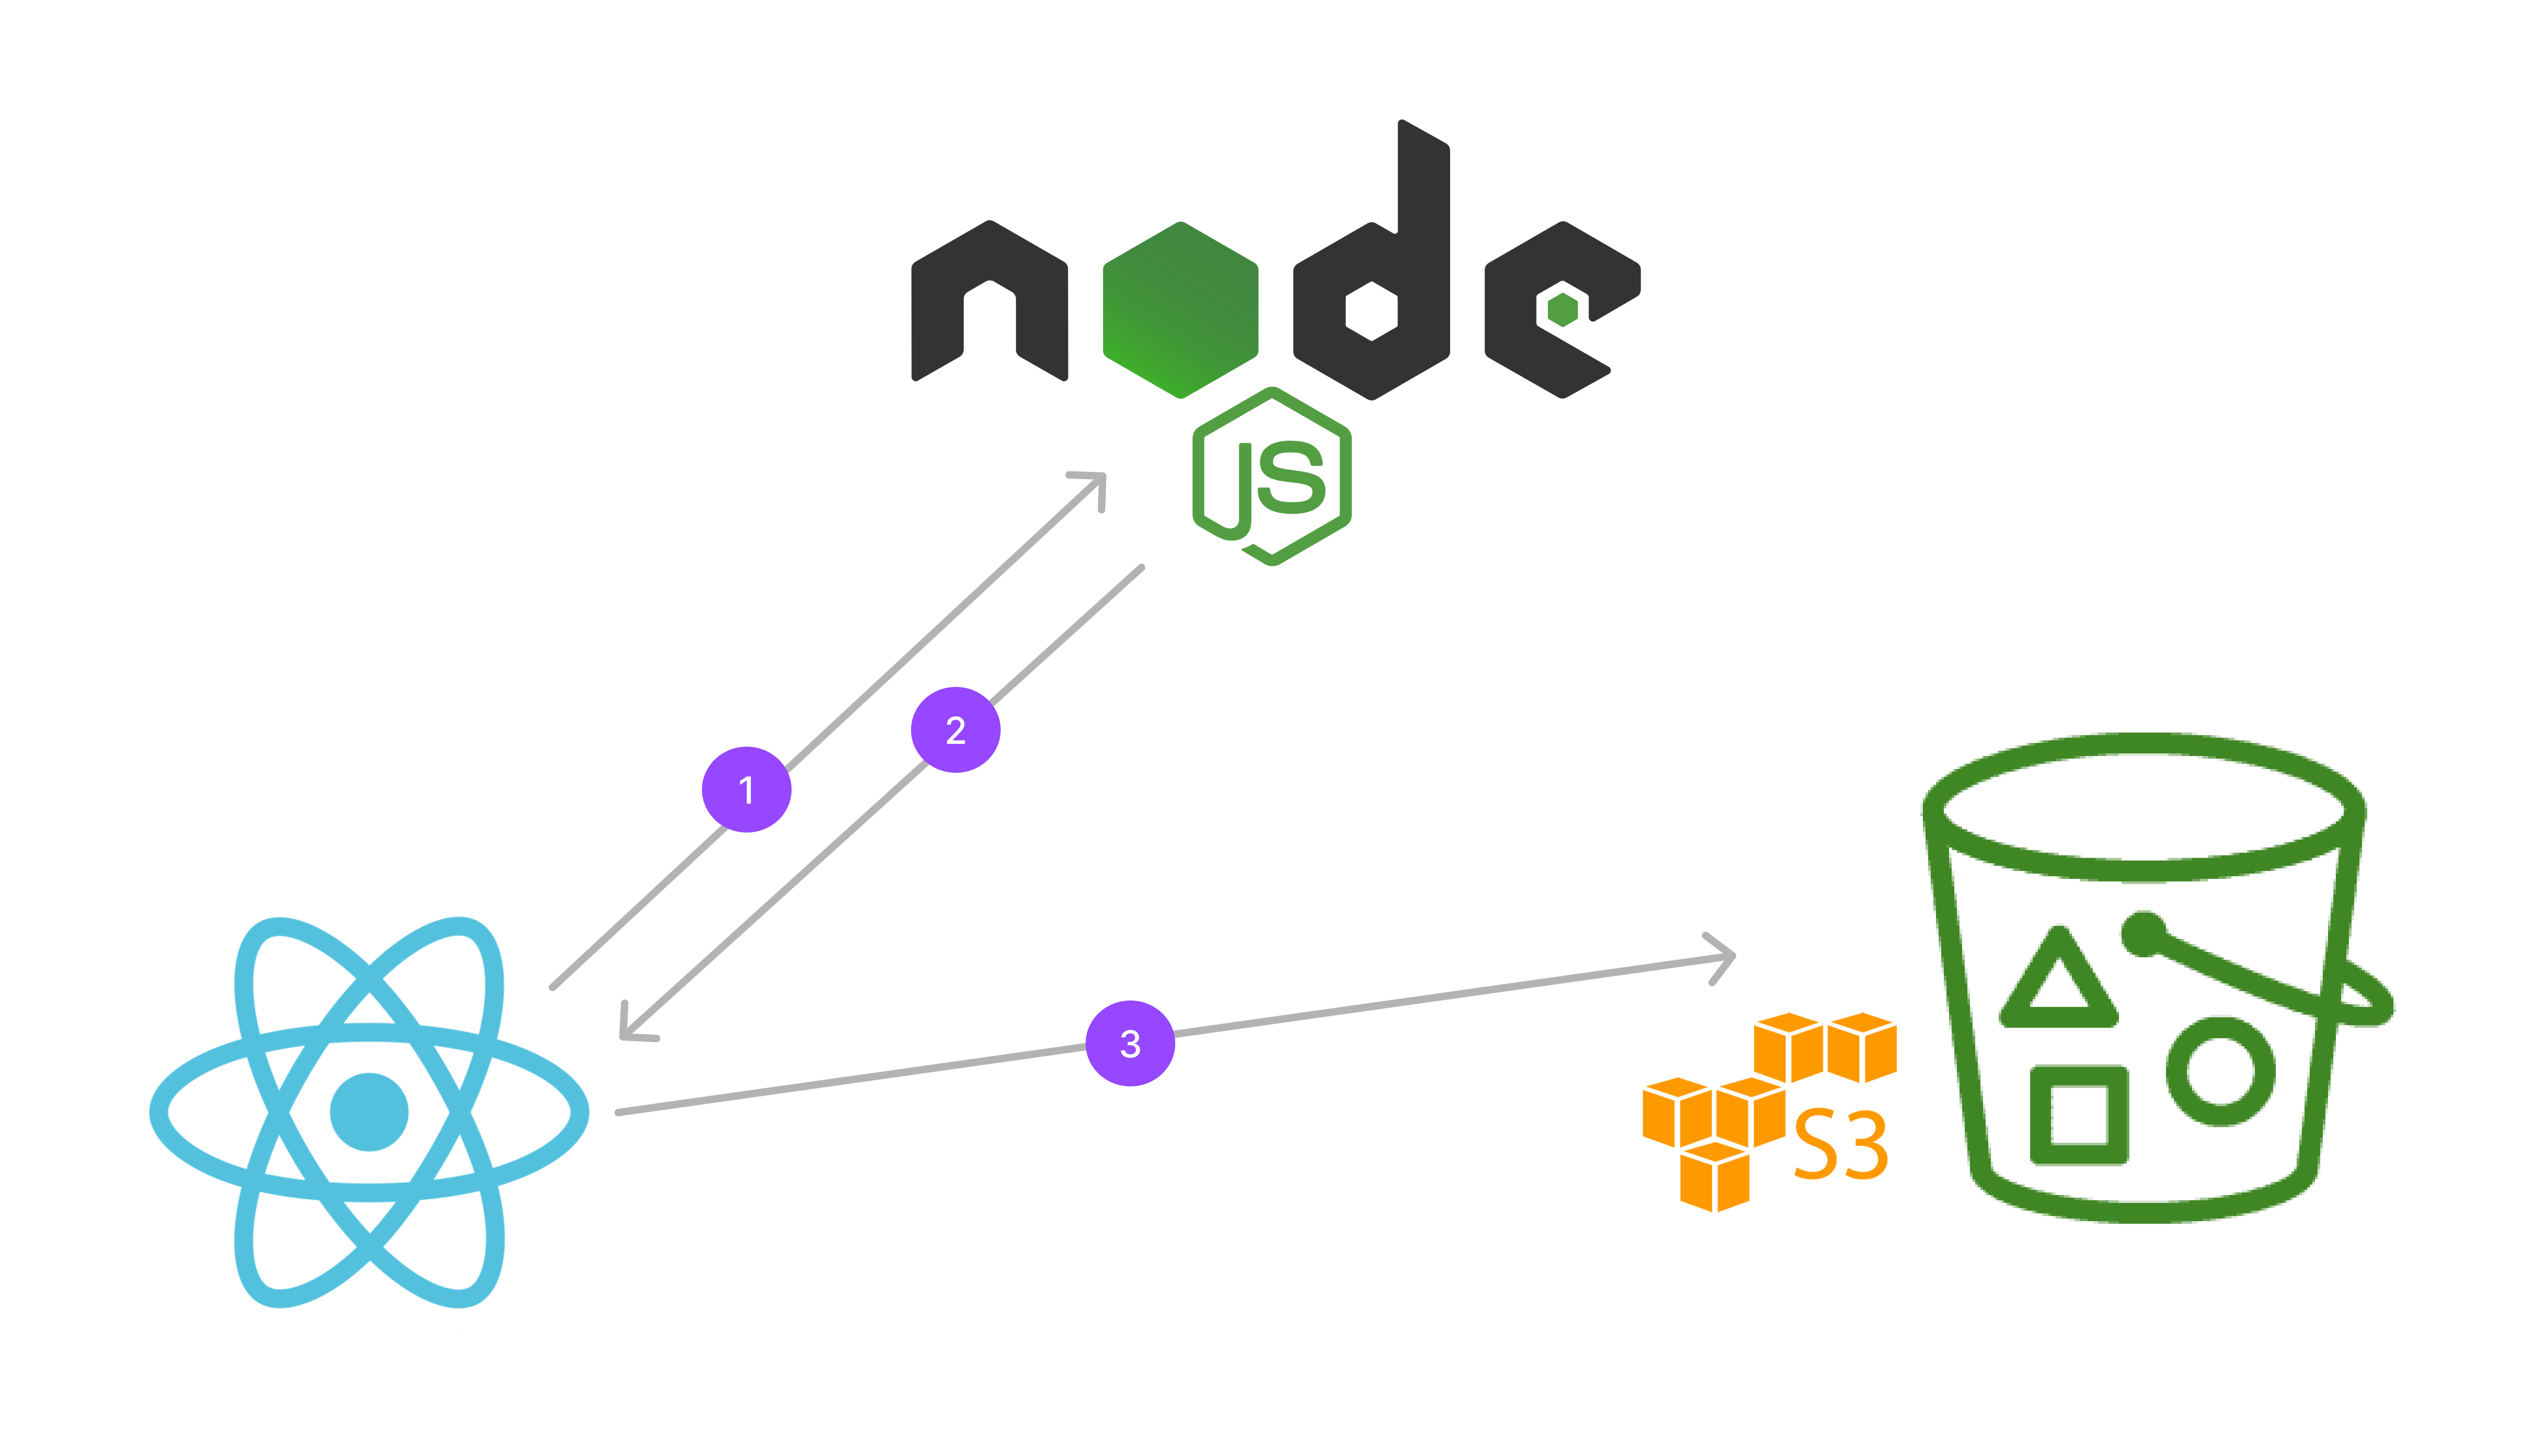
Setting up Node.js application and use AWS SDK to generate S3 Signed URL using AWS access credentials that will be used in our react application to upload files directly.

Umakant Vashishtha
Secure File Upload using AWS S3, Node.js and React using Signed URLs
In this three parts series, we are learning how to add secure file upload feature in your application using AWS S3, Node.js and React with Signed URLs.
Check the first part if you haven’t
Part 1: Setting Up S3 BucketTable of Contents
- Creating AWS Access Key for Programmatic Access
- Setting up Node.js application
- Setting up Config
- Signed URL Route
In this part, we will setup node.js application and use AWS SDK to generate S3 Signed URL using AWS access credentials that will be used in our react application to upload files directly.
If you prefer video tutorials, here is the series on YouTube.
Creating AWS Access Key for Programmatic Access
We will need AWS access keys to send programmatic calls to AWS from AWS SDKs To create AWS access keys, head over to IAM dashboard in AWS.
- First go to User Groups page and create a user group
- Select S3 Full Access Permission from the list of permissions in Attach Permission Policies tab and assign to this group
- Then go to the Users page and create a user and add the user to the User group created just now.
- Then select the created just and go to the Security Credentials tab and under Access keys section for the user, generate new access keys.
- Make sure to copy/download the secret key, it will not be shown again, we will need it in the next step
Setting up Node.js application
- Start a new npm project
- Install the following libraries with the given command:
Terminalnpm i express dotenv cors @aws-sdk/client-s3@3.400.0 @aws-sdk/s3-request-presigner@3.400.0
We are using specific versions for aws-sdk so that the code works as expected.
Setting up Config
- Create a
.env.localfile in the root of your project with the following variables:
.env.localPORT = 3010

# AWS IAM Config
AWS_ACCESS_KEY_ID = <YOUR_AWS_ACCESS_KEY_ID>
AWS_SECRET_KEY = <YOUR_AWS_SECRET_KEY>

# AWS S3 Config
AWS_S3_BUCKET_NAME = <yt-file-upload-tutorial>
- Create a new file
config/index.jsto load configurations for the node.js app.
config/index.jsimport { config as loadConfig } from "dotenv";

loadConfig({
  path: ".env.local",
});

const config = {
  PORT: parseInt(process.env.PORT, 10) || 3010,
  AWS: {
    AccessKeyId: process.env.AWS_ACCESS_KEY_ID,
    AWSSecretKey: process.env.AWS_SECRET_KEY,
    BucketName: process.env.AWS_S3_BUCKET_NAME,
    Region: "ap-south-1",
  },
};

export default config;
Generating Signed URL
Now let’s add a controller function to generate the Signed URL based on key and content_type in a new file utils/s3.js as shown below:
utils/s3.jsimport { PutObjectCommand, S3Client } from "@aws-sdk/client-s3";
import { getSignedUrl } from "@aws-sdk/s3-request-presigner";
import config from "../config/index.js";

const s3 = new S3Client({
  region: config.AWS.Region,
  credentials: {
    accessKeyId: config.AWS.AccessKeyId,
    secretAccessKey: config.AWS.AWSSecretKey,
  },
});

const BUCKET_NAME = config.AWS.BucketName;

export async function createPresignedPost({ key, contentType }) {
  const command = new PutObjectCommand({
    Bucket: BUCKET_NAME,
    Key: key,
    ContentType: contentType,
  });

  const fileLink = `https://${BUCKET_NAME}.s3.${config.AWS.Region}.amazonaws.com/${key}`;

  const signedUrl = await getSignedUrl(s3, command, {
    expiresIn: 5 * 60, // 5 minutes - default is 15 mins
  });

  return { fileLink, signedUrl };
}
To reiterate from the first part:
- Key: location of the file in s3 bucket
- Content Type: Metadata specifying the file type
Also note how the above code uses the config from the previous step.
- Use the function in the route handler as shown below
routes/misc.jsimport express from "express";
import { createPresignedPost } from "../utils/s3.js";

const s3Router = express.Router();

s3Router.post("/signed_url", async (req, res) => {
  try {
    let { key, content_type } = req.body;
    key = "public/" + key;
    const data = await createPresignedPost({ key, contentType: content_type });

    return res.send({
      status: "success",
      data,
    });
  } catch (err) {
    console.error(err);
    return res.status(500).send({
      status: "error",
      message: err.message,
    });
  }
});

export default s3Router;
We are adding public prefix for every key so that every file gets stored in the public folder for which we changed the setting such that all files in this location are accessible by public URL.
We are using the s3Router in my express app as below:
index.js
import express from "express";
import config from "./config/index.js";
import s3Router from "./routes/misc.js";
import cors from "cors";

const app = express();

app.use(express.json());
app.use(
  cors({
    origin: "http://localhost:3000",
  })
);

app.use("/api/s3", s3Router);

app.listen(config.PORT, () => {
  console.log(`Server listening on http://localhost:${config.PORT}`);
});
Start the application with node index.js, we should add this command in the start script as well.
Now we can test this by curl with the following command:
I am using the s3Router in my express app as app.use('/api/s3', s3Router).
We can test this by curl with the following command:
Terminalcurl  -X POST \
  'http://localhost:3010/api/s3/signed_url' \
  --header 'Accept: */*' \
  --header 'Content-Type: application/json' \
  --data-raw '{
  "key": "images/a.png",
  "content_type": "image/png"
}'
This should return a response as below:
Response{
  "data": {
    "signedUrl": "https://yt-file-upload-tutorial.s3.ap-south-1.amazonaws.com/public/images/a.png?X-Amz-Algorithm=AWS4-HMAC-SHA256&X-Amz-Content-Sha256=UNSIGNED-PAYLOAD&X-Amz-Credential=AKIA6DIIPAXK4E2THWRC%2F20230830%2Fap-south-1%2Fs3%2Faws4_request&X-Amz-Date=20230830T205324Z&X-Amz-Expires=300&X-Amz-Signature=ef0c4faa9fb48f25ba52e821a0453b2c25ee5e75f27eb60484cf23b1434c46d4&X-Amz-SignedHeaders=host&x-id=PutObject",
    "fileLink": "https://yt-file-upload-tutorial.s3.ap-south-1.amazonaws.com/public/images/a.png"
  }
}
We can test this URL by Postman or similar tool by making a PUT request.
In the request body, add any PNG file and in the headers, add content-type: image/png. You should get 200 OK response.
In the next part, we will build the react application to upload files directly to AWS S3 using Signed URLs generated from our node.js application.
Thank you for reading, please subscribe if you liked the video, I will share more such in-depth content related to full-stack development.
Happy learning. :)
Similar Articles
Using Signed URLs in React | File Upload using AWS S3, Node.js and React - Part 3
Building the react application to upload files directly to AWS S3 using Signed URLs generated from our node.js application.
Oct 15, 2023 · 15 mins
Setting Up S3 Bucket | File Upload using AWS S3, Node.js and React - Part 1
Setting up S3 bucket and allowing public read access on a prefix URL
Oct 06, 2023 · 20 mins

Clustering - Run Multiple Instances of Node.js Application
Improving Node.js Application Performance With Clustering
May 05, 2023 · 25 mins
